 Save Pin
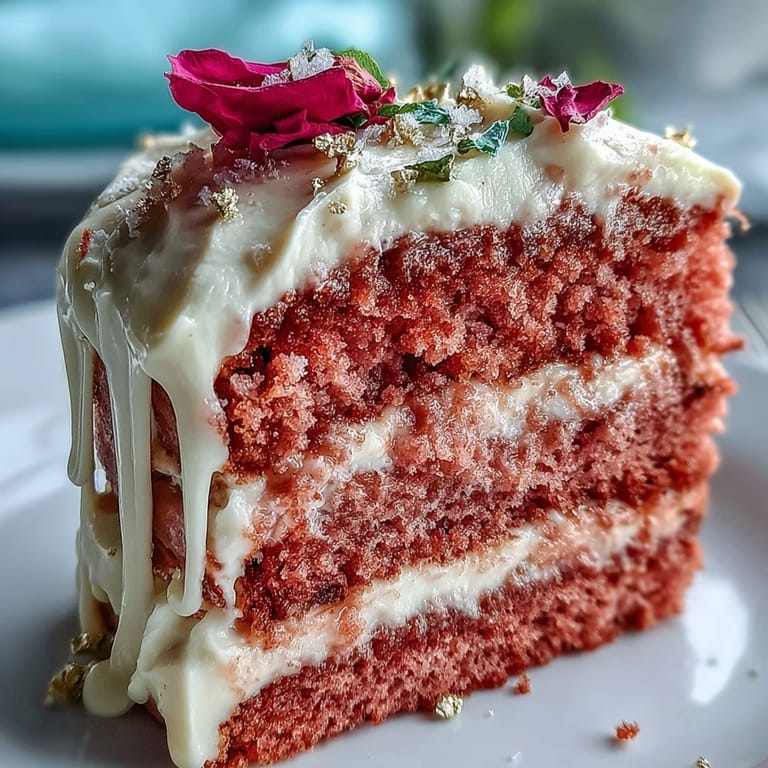
 Some cakes just command attention the moment they leave the kitchen—none more so than this blush-pink rosé velvet cake. The first time I tackled it, my kitchen was alive with anticipation and the gentle pop of a newly opened bottle of rosé. It wasn’t my own bridal shower, but the laughter of friends filling the other room made me feel part of something sparkling and special. I watched as the sunlight caught the shimmer of edible gold, wondering if the flavor would live up to its glamour. When I finally sliced into that delicate crumb, the quiet surprise of rosé and chocolate hit just right.
There was a moment, right as I painted on the gold drip, that my hands shook—not out of nerves, but because the neighbor’s playlist kept making me laugh mid-drip. The kick of energy, the scent of cocoa undercut by whispers of wine, and the memory of icing failures from past birthdays all swirled together. My best friend snuck a spoonful of buttercream, unconcerned with the occasion, declaring it the new benchmark for ‘grown-up pink cake’. By the time the cake made it to the table, gold gleaming, we were all ready for its close-up. Sometimes, it’s these silly, imperfect moments that make a recipe a keeper.
Ingredients
- All-purpose flour: Makes for a sturdy crumb, but sift it for the softest texture—especially when the cake needs to be so elegant.
- Granulated sugar: Beyond sweetness, it ensures the coveted velvety texture—don’t rush when creaming it in.
- Baking soda: Helps with the cake’s rise and balances the acidity from the rosé.
- Fine salt: A pinch sharpens and amplifies every flavor, so don’t skip it.
- Cocoa powder (unsweetened): Just enough for depth—choose a high-quality one for a richer undertone.
- Vegetable oil: Much lighter than butter, keeping the crumb tender for a proper pink velvet experience.
- Eggs: Bring them to room temperature so they emulsify beautifully into the batter.
- Buttermilk: Reacts with baking soda for extra lift; let it lose its chill before adding.
- Rosé wine: Use a dry or sparkling style—add it slowly so as not to dull the cake’s pink hue.
- Vanilla extract: Smooths out the flavors; it’s the silent hero in both cake and frosting.
- White vinegar: Gives that signature velvet cake tang and helps the color shine.
- Pink or rose gel food coloring: Go drop by drop; the shade can shift quickly but the right tone is everything.
- Unsalted butter: The base of a dreamy, pillowy buttercream—beat it longer than you think you should.
- Powdered sugar: Sift to avoid those embarrassing lumps in your fancy frosting.
- Heavy cream: Needed for the gold drip—keep it just warm enough to melt, not scorch, the chocolate.
- White chocolate chips: Melting can be tricky, so go slow and stir constantly for utter smoothness.
- Edible gold luster dust: Hunt down a reputable brand to ensure safety and showstopping bling.
- Vodka or clear lemon extract: They evaporate quickly, leaving only shimmer and shine behind.
- Edible gold accents, rose petals, or berries: Optional, but worth it for that wow factor.
Tired of Takeout? 🥡
Get 10 meals you can make faster than delivery arrives. Seriously.
One email. No spam. Unsubscribe anytime.
Instructions
- Prep the pans:
- Grease and line three 8-inch cake pans with parchment—the corners of the paper make for a much smoother cake release.
- Sift dry ingredients:
- Flour, sugar, baking soda, salt, and cocoa combine best when sifted together; watch that cloud of cocoa hover for a second before settling in.
- Whisk the wets:
- In a separate bowl, whisk oil, eggs, buttermilk, rosé, vanilla, and vinegar until the mixture looks creamy and slightly frothy.
- Combine and color:
- Pour wet into dry and fold gently—just to combine—before you swirl in the rose gel food coloring for a custom blush.
- Bake:
- Divide the cheerful pink batter evenly among pans and bake at 350°F for about 30–35 minutes; a toothpick should come out with just a few tender crumbs.
- Cool completely:
- Let cakes cool in pans for 10 minutes, then invert onto racks—resist the urge to frost before they're fully cool.
- Buttercream magic:
- Beat soft butter until pale and fluffy, then add powdered sugar slowly—savor the transformation as it goes from stiff to beautifully spreadable.
- Flavor and adjust:
- Blend in rosé wine, vanilla, and a pinch of salt; tweak the consistency with more wine or sugar as needed for spreadability.
- Stack and crumb coat:
- Level cake layers if needed, spread a thick swoosh of buttercream between each, then coat the whole cake in a thin layer before chilling briefly.
- Finish the frosting:
- Cover the cake with another layer of buttercream, smoothing carefully; unfussy swirls or razor-sharp sides both impress here.
- Make the gold drip:
- Gently melt white chocolate chips with cream, cool slightly, then pour around the cake’s edge so dreamy drips cascade down.
- Gold paint flair:
- Mix gold luster dust with a dash of vodka or lemon extract and paint onto the hardened drips for max shimmer.
- Decorate:
- Add edible gold accents, fresh petals, or berries as the final, memorable flourish.
 Save Pin
 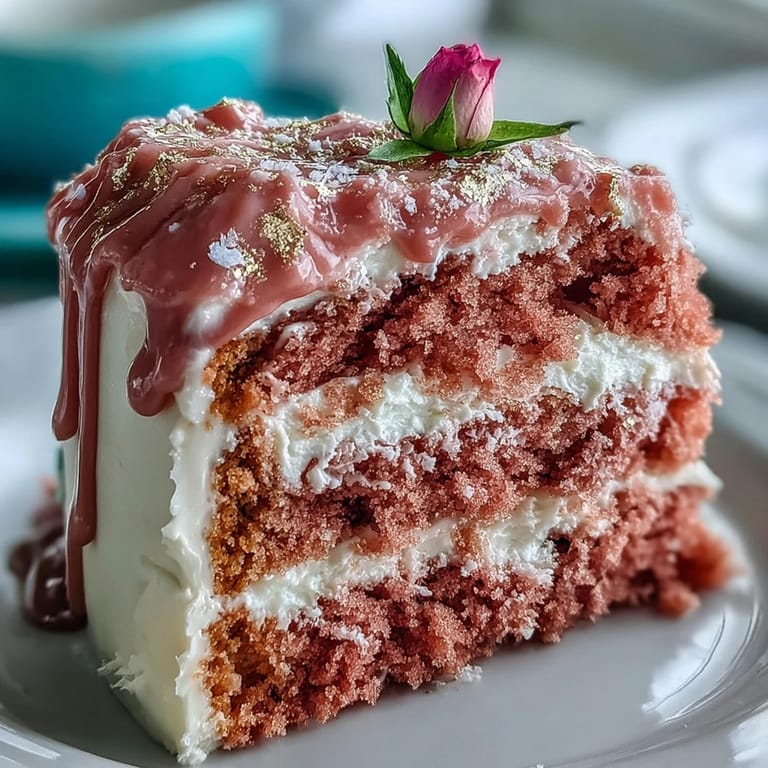 Save Pin
 No dessert has gotten more photographs at my table; I still chuckle at the lineup of phones around the cake, each person angling for the perfect shot. When the first forkful was met with a chorus of delighted sighs and laughter, this cake had become part of our celebration, not just the centerpiece.
Rosé Cake Know-How From My Kitchen
Chilling the cake after the crumb coat changed everything—gone are the days of buttercream sliding sideways or crumbs muddying the perfect finish. Once I started freezing the bowls of white chocolate before painting, each gold drip stayed sharp and dazzling, never drooping down to the plate unexpectedly. These tweaks may be small, but they made all the difference in making the finished cake feel truly party-worthy.
How to Get That Luscious Pink Hue
Coloring a batter isn’t always as simple as it looks. I learned to add food coloring just a tiny bit at a time and stir gently, since overmixing can dull both the cake’s structure and its rosy shade. If you really want the pink to pop, use a white-based gel color and mix it in slowly, pausing to check in natural light before deciding to add more.
Helping Your Cake Dazzle on the Dessert Table
Presentation is half the fun with a cake like this, so take a breath and space out your decorations. My favorite trick is adding a few edible rose petals or sugar pearls to catch the light. Don’t forget to chill the cake for at least an hour before showing it off—it keeps every gold accent crisp and the buttercream perfectly set.
- If you’re nervous about the drip, practice on an upside-down bowl first.
- Have extra buttercream on hand in case you need a touch-up.
- Always use a food-safe brush for the gold paint.
 Save Pin
  Save Pin
 Whether you’re toasting an engagement or just treating yourself to something a little extravagant, this rosé velvet cake always feels like a reason to celebrate. Here’s to edible sparkle and making memories, one gold-flecked slice at a time.
Recipe Questions & Answers
- → Can I use sparkling rosé instead of still rosé?
Yes. A dry or lightly sparkling rosé adds bright floral-fruit notes; use the same volume and taste the batter before adjusting. Sparkling wine can add a lift to the buttercream as well.
- → How do I get a vivid pink without thinning the batter?
Choose a concentrated gel or paste color and add it sparingly until you reach the desired shade. Gel color won’t alter batter consistency the way liquid dyes can, so you maintain structure while achieving a strong hue.
- → What keeps the buttercream smooth and stable for assembling?
Beat room-temperature butter until light, then add sifted powdered sugar gradually. Chill between the crumb coat and final frosting to firm up the layers, and adjust thickness with small amounts of rosé or extra sugar for spreading consistency.
- → How do I make the gold drip safe and shiny?
Use white chocolate and cream for the drip base, cool slightly until just pourable, then paint with edible gold luster dust mixed into a food-safe clear spirit or extract. Only use luster dust labeled edible; avoid non-food metallics.
- → How do I prevent the drip from running too far down the sides?
Chill the frosted cake so the surface is firm before applying the drip. Let the drizzle cool to a slightly thickened pourable consistency and test a small area first; apply slowly to control the length of each drip.
- → Can this be made ahead and how should it be stored?
Yes. The cake can be assembled a day ahead and refrigerated. Cover lightly to protect decorations, then bring to room temperature before serving to restore texture; store away from strong odors.